Ready Mix Concrete

Ready Mix Concrete

Ready Mix Concrete

Concrete is a composite consisting of the following main constituents: cement, aggregates, water, and admixtures.

It is a material that can be cast into different shapes, is durable, is the most attractive construction material in terms of compressive strength (construction material with highest strength per unit cost), and its increasing use is fundamental for sustainable construction.

Sustainable Benefits of Ready-Mix Concrete

  • We continuously work to improve the properties of concrete that make it a key component of sustainable construction: durability, resistance to aggressive environments, light reflection, and capacity to store energy, among others.
  • We also constantly work to develop innovative solutions that advance the sustainability of structures made with concrete. In this way, our customers can design sustainable buildings that can take advantage of the benefits of concrete in a wide range of applications.

Engineered Concrete

  • A special design of high performance concrete combines durability and low maintenance with resistance to aggressive environments.
  • Industrial Applications: concrete with high acid resistance is robust and durable for such uses as cooling towers.

Building and Housing

  • Structures: self-compacting concrete improves strength and durability of building structures, while reducing energy use and noise due to concrete vibration.
  • Envelope: structural lightweight concrete or Insulating Concrete Forms offer insulation solutions to improve energy efficiency in buildings.
  • Building Design: concrete’s capacity to store energy—its thermal mass—minimizes temperature fluctuations in a building over the course of the day, reducing the need for additional heating and cooling.

Water and Wastewater Management

  • Pervious Pavement: pervious concrete allows rainwater to filter through and reduce flooding, while helping to decrease heat concentration.
  • Water Channels: concrete water channels are used in farming to reduce the amount of water lost as it flows through fields. Locally produced concrete also provides an affordable solution.
  • Potable Water and Sewage Systems: high performance concrete is used for pipes, which are affordable, long-lasting, have high structural strength, and can withstand water abrasion.
  • Wastewater Treatment Plants: special cements and high technology concrete design increase chemical resistance and reducing maintenance.

Roads and Pavements

Paving: Concrete roads are durable and need little maintenance. They require less energy for street lighting, keep urban areas cooler, and decrease the urban heat island effect.

Important observations regarding curing

Important observations regarding curing

Important observations regarding curing

(1)  Curing should be started earliest as possible.

(2)  For the portion of concrete which is covered with formwork, the curing should be started as soon as the formwork is removed.

(3)  On exposed surface, it should be started when concrete has sufficiently hardened such that it doesn’t get disturbed by curing.

(4)  Ensure uninterrupted curing. If it is discontinued for any reason, the reaction of hydration will be stopped permanently. The partial hydration makes the capillary pores discontinuous and water can’t enter the concrete even if the curing is started again.

(5)  High strength concrete should be cured at an early age.

(6)  There is a widespread belief that humid climate is sufficient and curing is not required in rainy season.

(7)  The person generally entrusted for curing is the most unskilled person. He doesn’t appreciate the importance of curing. In fact he believes that curing is a process of wastage of water time and money.

(8)  It can’t be made a measurable item in the contract.

Therefore the best and practical method to ensure proper curing is the education of the person who is responsible for curing. Once he understands the importance of curing, he would certainly ensure it.

Foundation Walls and Basements

Foundation Walls and Basements

Foundation Walls and Basements

Basements are quite common in many parts of the country and almost unheard of in others. Where the frost line is relatively shallow and the footings are therefore close to the finish grade, only a short foundation wall (or stem wall as they are sometimes called) is needed to bring the construction above ground to provide support for the building frame. In cold climates where footings are required to be set deep in the ground to avoid frost heave, foundation walls may have to be several feet tall to reach above grade. With a little additional excavation, the footings can be set deeper and the foundation wall height extended sufficiently to accommodate construction of a habitable basement that is fully or partially below grade. The taller the foundation wall required by footing depth, the less additional work required to enclose a basement space.

Building Code Requirements

Sealing and Staining Concrete

Sealing and Staining Concrete

Most jurisdictions prescribe minimum building code requirements for the construction of residential foundations. The following basic requirements Code are fairly representative of those found in many municipalities.

  • Fill material which supports footings and foundations must be designed, installed, and tested in accordance with accepted engineering practice.
  • The grade away from foundation walls must fall a minimum of 6 in. within the first 10 ft. Where lot lines, walls, slopes, or other physical barriers prohibit the minimum slope, drains or swales must be provided to ensure drainage away from the structure.
  • In areas likely to have expansive, compressible, or shifting soils or other unknown soil characteristics, the building official may require a soil test by an approved agency to determine soil characteristics at a particular location.
  • When topsoils or subsoils are expansive, compressible, or shifting, they must be removed to a depth and width sufficient to assure stable moisture content in each bearing area or stabilized within each bearing area by chemical treatment, dewatering, or pre saturation. Unstable soils that are removed may not be used as fill in other areas.
  • Concrete must have a minimum compressive strength

Hot Weather Concreting

Hot Weather Concreting

Hot Weather Concreting

Hot weather can also be damaging to concrete. The fresh mix will require more water than usual to achieve the required slump and workability, will set faster and have reduced working time, will more likely experience plastic shrinkage cracking on the surface, and will suffer variations in air content. The hardened concrete will have lower strength, more drying shrinkage and tendency to crack, less durability in freeze thaw exposures, and less uniform surface appearance. The adverse effects of hot weather increase as temperatures rise, relative humidity falls, and wind increases, and the damage can never be completely undone. There are, however, a number of recommendations which can help avoid problems. The following protective measures should be taken when temperatures are 90°F or above, especially when accompanied by windy conditions or relative humidity below 25%.

  • To decrease the possibility of plastic shrinkage cracking, use the largest size and amount of coarse aggregate compatible with the job requirements and, if ordering from a ready mix supplier, specify a water reducing admixture.
  • Locate control joints at slightly closer intervals than when concreting in milder temperatures, and plan the locations of construction joints ahead of time with smaller working areas in mind.
  • Use sunshades or windbreaks as appropriate, and avoid working during the hot afternoon.
  • Have enough workers on hand to keep the job running smoothly and quickly.
  • If you are mixing concrete on site, sprinkle aggregate stockpiles ahead of time for evaporative cooling and use ice as part of the mixing water.
  • Reduce the time between mixing and placing as much as possible and avoid excessive mixing. Do not add water to ready mixed concrete at the job site.
  • Moisten the forms and reinforcement and moisten soil sub grades before placing the concrete.
  • Cure the concrete for at least three days, but preferably for one week. When forms are removed, provide a wet cover for newly exposed surfaces.

The primary concern of hot weather concreting is the rapid loss of mixing water to evaporation. All of the protective measures outlined are aimed at preserving the moisture needed for cement hydration and curing. If adequate moisture can be maintained in the concrete for at least three and preferably seven days, there will be no decrease in the quality of the concrete compared to that placed and cured in milder weather.

Cold Weather Concreting

Cold Weather Concreting

Cold Weather Concreting

Cold weather can have damaging effects on freshly placed concrete. Both setting time and rate of strength gain are slower in cold weather, and if the concrete freezes during the first few days of curing, it will suffer reduced strength and weather resistance, and increased moisture permeability. When it is necessary to work in cold weather, certain precautions must be taken to assure the quality of the finished concrete.

Cold weather is defined as a period when the mean daily temperature drops below 40°F for more than three consecutive days. On commercial projects, heated enclosures are often provided to protect concrete and masonry work during cold weather. Although this is not usually done on residential work because of the expense, the following protective measures can and should be taken.

  • For slabs and other flatwork such as driveways, sidewalks, and patios, reduce the amount of mixing water so that the concrete has a slump of 4 in. or less. This will minimize bleeding of mix water to the surface and decrease the time until initial set.
  • Use air-entrained cement or an air-entraining admixture even if the concrete will not be exposed to freeze-thaw cycling in service.
  • Use either an extra bag of cement per cubic yard of concrete, a high-early-strength cement (Type III), or a non chloride set accelerator to develop strength faster.
  • If you are ordering from a ready-mix supplier, specify heated concrete with a minimum temperature.
  • Remove ice and snow from inside forms and thaw frozen sub grade before concrete placement.
  • If you are mixing concrete on site, store ingredients in a heated area if possible, and use heated water for mixing.
  • Reduce the time between mixing and placing as much as possible to reduce heat loss. Work with smaller batches if necessary.
  • Delay form removal as long as possible to minimize evaporation and to reduce damage to formed surfaces caused by premature form stripping.
  • Wrap protruding reinforcing bars with insulation to prevent heat drain.

Whenever you can schedule concrete pours during milder weather, it is best to do so, but in some climates this is impractical. When cold weather concreting cannot be avoided, quality does not have to be sacrificed if proper precaution is exercised.

Curing Concrete

Curing Concrete

Curing Concrete

Concrete must be kept moist for several days after it is placed to allow the portland cement in the mix to cure and harden properly. The most common methods of curing concrete are as follows:

  • Cover the surface completely with large sheets of plastic. Be sure to keep the plastic flat on the surface of the concrete, or it will cause uneven coloring. Weight down edges and joints with pieces of lumber.
  • Cover the surface with roofing felt. Tape the joints and edges or weight them down with pieces of lumber to help seal moisture in and retard evaporation.
  • Cover the surface with burlap bags, using a garden hose to keep the bags wet.
  • Sprinkle or fog the concrete with a garden hose or sprinkler.
  • Apply a chemical curing compound.

Plastic sheeting and roofing felt can cause uneven discoloration of the concrete surface if they are not kept flat. On large surfaces, it is difficult to smooth out all of the wrinkles in a covering, so if the concrete will be exposed to view and its appearance is important, use another method for curing. Wet burlap curing should not be used on colored concrete surfaces because it can cause the color to become splotchy. Keep the concrete moist for seven days.

After concrete slabs have cured for 24 hours, and concrete walls and footings for three days, remove the forms, but do not pry or hammer against the concrete itself. The concrete will continue to cure slowly for another month until it reaches full strength, but slabs are safe to use for foot traffic after the first day and for light rubber-tired vehicles after the first week. Heavy traffic areas should be protected with plywood. Foundation walls and footings should cure for at least two weeks before substantial framing loads are added.

Concrete Finishing

Concrete Finishing

Concrete Finishing

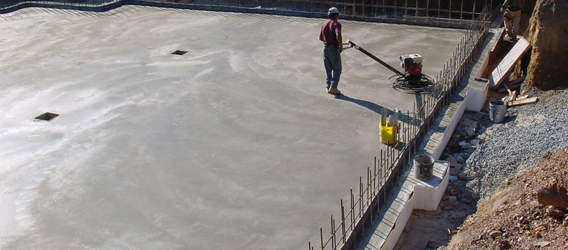
The tops of concrete slabs, driveways, patios, and sidewalks must be leveled and finished to apply an appropriate surface texture. Surface finishes may be simple and utilitarian or more elaborate and decorative.

Floating, Troweling, and Brooming

The tops of footings and walls are left unfinished after the concrete has been vibrated, but flat concrete elements such as slabs, driveways, sidewalks, and patios must be leveled on top and an appropriate  finish applied.

Special Finishes

An exposed aggregate finish will add color and texture to a driveway, sidewalk or patio, as well as a non slip finish. The concrete should be poured in small, manageable areas so that the aggregate can be seeded into the surface before the concrete becomes too hard. The seeding method of creating an exposed aggregate finish takes about three times longer than normal finishing so it is usually done in smaller sections.

Pouring Concrete

Pouring Concrete

Pouring Concrete

There are several rules to follow when pouring concrete. The first is that concrete should be placed in the forms as soon as possible after it is mixed. Delays result in evaporation of moisture from the mix and a loss of both workability and strength. If the concrete is not placed within 11 ⁄ 2 hours and shows signs of stiffening, it should be discarded. Do not add water to a mix that has begun to stiffen. Even if you succeed in restoring some workability, the concrete will be of poor quality. To avoid delays, it’s important to make sure that all the necessary preparations have been made before the ready mix truck arrives or before you begin mixing. Preparations should include wetting the inside surfaces of plywood and kiln dried lumber forms and the soil sub grade to keep them from absorbing too much water from the concrete mix. Linseed oil or commercial form release oil can be used. Oiled forms will also make form removal easier without damage to the concrete surfaces. Oiling or wetting the forms and soil is especially important on a warm and windy day when moisture evaporation is at its highest.

The second rule in pouring concrete is to place the mix as near to its final location as possible. A ready-mix truck is equipped with metal chutes which can be extended a moderate distance to deliver concrete directly into the forms, and concrete pumps are often used on large commercial projects. On residential projects, it is more common to use wheel barrows or buggies to move the concrete from the mixer to the forms. You can build ramps and runways over the forms to keep from bumping the boards or reinforcing out of place. Deep forms may require pouring in more than one lift or layer.

The third rule in pouring concrete is to effectively compact or consolidate the fresh mix immediately after it is placed and before it begins to stiffen. Concrete must be consolidated to eliminate air pockets and voids and to get the concrete to flow around reinforcement and anchorages. In very small applications, adequate consolidation can be achieved by rodding or puddling by hand with shovels, metal rods, or tampers, but mechanical vibration is preferred on most applications.

Mixing Concrete on Site

Maintaining Your Concrete Driveway

Maintaining Your Concrete Driveway

If you’re mixing concrete on site, the mixing area should be close to the pour area if possible, and your ingredients stockpiled nearby. Store bags of cement off the ground and cover them with plastic to keep them dry. Small quantities of sand can usually be purchased in bags at building supply yards. Larger quantities of both sand and gravel are sold by the ton or half ton by aggregate suppliers and delivered to the site in dump trucks. Spread tarps on the ground before the sand is dumped so that the moisture content of the sand is not affected by the moisture content of the soil, and so that rocks or soil are not accidentally shoveled up with the sand.

One of the most important things in mixing concrete is consistency from batch to batch. The ingredient weights and proportions are based on “wet” sand. Most sand that is sold for construction uses is “wet” sand, and the moisture that it contains has been accounted for in the recommended amounts of mixing water. If the sand you are using is “damp” rather than “wet,” and you are mixing ingredients by weight, reduce the quantity of sand in Table A by one pound, and increase the quantity of water by one pound. If your sand is “very wet,” increase the quantity of sand by one pound and decrease the water by one pound. The moisture content of sand is more difficult to adjust for when proportioning mixes by volume rather than weight.

Quick Tip 

  • Damp sand falls apart when you try to squeeze it into a ball in your hand.
  • Wet sand forms a ball when squeezed in your hand, but leaves no noticeable moisture on the palm.
  • Very wet sand, such as sand exposed to a recent rain, forms a ball if squeezed in your hand, and leaves moisture on the palm.